WordPress Performance Optimization
[sc:wpcloud]If you use a managed host, there won’t be as much to do to optimize your WordPress site. If you self-host, there’s a lot that you need to do.
Caching and Scaling
If your site receives thousands of requests, WordPress will struggle to build each page dynamically for each reader. It’s best practice to use some caching solution – so that most pages are stored on disk or in memory and served directly to your readers when they request them.
I’ve written an extensive guide to using Varnish Cache with the W3 Total Cache plugin on Apache. I find that this is an extremely straightforward, robust solution to scaling. This site regularly receives traffic from popular sites such as Slashdot, BoingBoing and Salon, sometimes simultaneously – and my caching configuration almost always handles this smoothly.
Because caching works primarily with readers that are not logged into your WordPress site, it’s useful to use a cacheable comment system besides WordPress, something like Disqus. This ensures that a higher percentage of page requests are served from your cache.
Content Delivery Network (CDN)
W3TC also integrates well with various content delivery networks (CDN). A CDN duplicates and distributes your content geographically to speed delivery of regularly used files such as theme css, javascript and media files. Using a CDN greatly reduces the number of inbound requests to your WordPress server. Read my guide to integrating Amazon’s CloudFront, which I use with this site.
Setting up custom subdomains on an alternate domain from your primary site can speed delivery of CDN content. For example, my CDN serves from a different domain entirely than jeffreifman.com so that cookie data is not carried along with each file request.
Other Ways to Improve Performance

- Monitor and Manage Memory Usage
- Creating a Swap File
- Create Backups
- Monitor Usage Charges with Billing Alarms
- Reduce Costs with a Reserved Instance
- Secure and Tune MySQL Server
- Set Up and Secure Postfix for Contact Forms
- Run the New Relic APM for Performance Monitoring
- Integrating Google Page Speed to W3 Total Cache
- Use WP Optimize to cleanse your database
Monitor and Manage Memory Usage
WordPress, its plugins, Apache and Varnish together can bump up close to the AWS Micro instance memory limits. Reboot your instance once after this tutorial and monitor how much memory you’re using. From Terminal, SSH in and do:
sudo reboot
Or, you can do this from the EC2 Dashboard as shown in the image below. See the Actions menu. 
Monitor activity on your instance with free or top:
free

Or, use top. Typing ‘q’ will exit top.
top

Try hitting different pages of your WordPress site and see how it impacts memory usage. Try accessing pages from your mobile and tablet devices too. If you are using an Amazon Micro instance, it’s likely you will need to configure a swap file on EBS to prevent your instance from crashing.
Configure a Swap File
While it’s easy to set up, there are some small risk of incurring unbounded internetwork bandwidth charges – so be sure to monitor your site and set up billing alarms as described below. However, once you set up a swap file, your micro instance should be stable.
dd if=/dev/zero of=/swapfile bs=1M count=1024
mkswap /swapfile
swapon /swapfile
Now, to make the swapfile persistant across reboots, edit the fstab file:
sudo nano /etc/fstab
Add this line:
/swapfile swap swap defaults 0 0
Verify the swap file is active by typing:
free
It should show something like:
Swap: 1048572 0 1048572
Backups
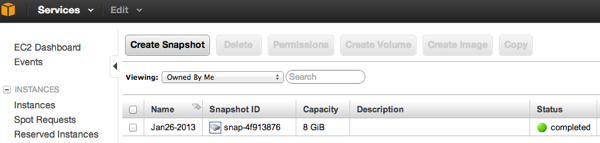
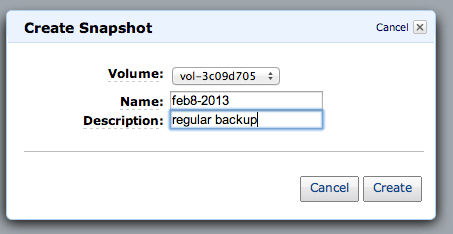
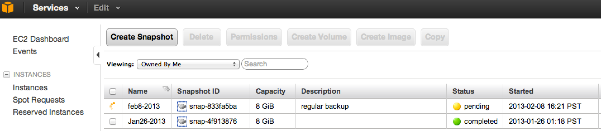
You can create manual backups from the Instances list of the EC2 Console, you can click Create Snapshot:
You can use a script such as ec2-automate-backups to make automated, regular backups. The script is also designed to purge old backups. I’m hoping to add more precise description for using this soon.
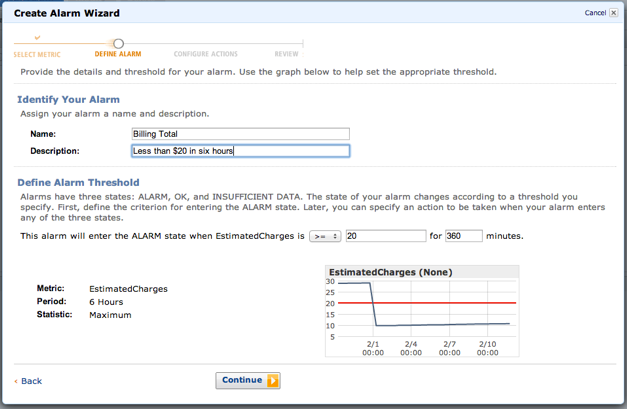
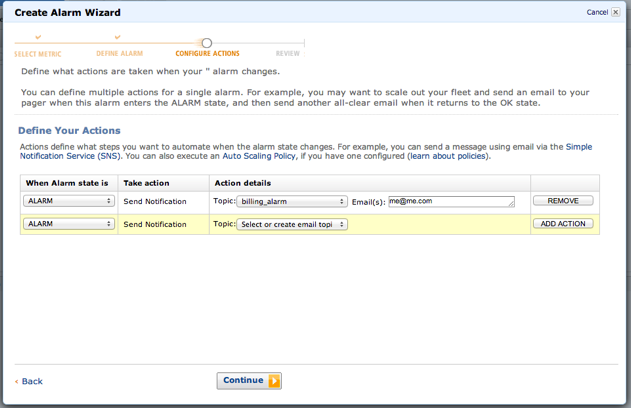
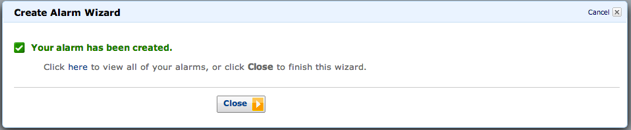
Monitor Usage Charges with Billing Alarms
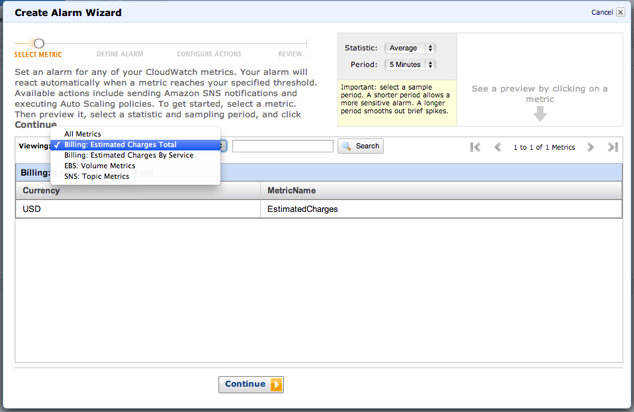
You can use Amazon’s CloudWatch to monitor activity on your instance and create alarms but this has some additional costs. However, Amazon does allow you to use CloudWatch for free billing alerts.

Go to the Cloudwatch console. Click Alarm. Go through the process of creating an alarm for billing charges. It should look something like this:

Reduce Costs with a Reserved Instance
As we discussed in the pricing section, purchasing a reserved instance can save you significant money. Once you are comfortable with your WordPress site on a micro or small instance, consider purchasing a one year or three year reserved instance. If you change your mind later, Amazon does offer a marketplace for selling unused portions of reserved instances (for a small commission). I’ve found it works well and have sold two instances within a few weeks.
Secure and Tune MySQL Server
From your server, run this service which walks you through the steps to secure MySQL:
mysql_secure_installation
Try running this Perl script which tunes MySQL. From your server:
wget https://raw.github.com/rackerhacker/MySQLTuner-perl/master/mysqltuner.pl
perl mysqltuner.pl
The output from MySQL Tuner will look something like this:

Sample Report from MySQL Tuner
Set Up Postfix for Contact Forms
Many WordPress templates and sites include contact forms with automated PHP-based emailers. You can install Postfix to enable email.

Sample Contact Forum with Math CAPTCHA
sudo apt-get install postfix
You can accept the default configurations during the installation.
It’s important to take some basic precautions to secure your Postfix setup (to prevent unwanted access from spammers). Edit the Postfix configuration file:
sudo nano /etc/postfix
Here are a few important lines to change or add:
mydestination = yourdomain.com
mynetworks = 127.0.0.0/8 [::ffff:127.0.0.0]/104 [::1]/128
disable_vrfy_command = yes
Here are a few more restrictions that may be useful (described more fully here):
smtpd_recipient_limit = 3
strict_rfc821_envelopes = yes
smtpd_delay_reject = yes
smtpd_helo_required = yes
smtpd_helo_restrictions =
    permit_mynetworks,
    reject_non_fqdn_helo_hostname,
    reject_invalid_helo_hostname,
    permit
smtpd_sender_restrictions =
    permit_mynetworks,
    reject_non_fqdn_sender,
    reject_unknown_sender_domain,
    permit
smtpd_recipient_restrictions =
   reject_unauth_pipelining,
   reject_non_fqdn_recipient,
   reject_unknown_recipient_domain,
   permit_mynetworks,
   reject_unauth_destination,
# optional
#   check_sender_access
#         hash:/etc/postfix/sender_access,
   reject_rbl_client zen.spamhaus.org,
   reject_rbl_client bl.spamcop.net,
   check_policy_service unix:postgrey/socket,
   permit
Restart Postfix:
sudo /etc/init.d/postfix restart
You may also want to do more reading on the topic of installing, configuring and securing Postfix.
If your contact forms include CAPTCHA to reduce spam, you need to instruct your Varnish configuration file not to cache these pages.
Edit your Varnish configuration file:
sudo nano /etc/varnish/default.vcl
Right before this line:
# Check the cookies for wordpress-specific items
Add this:
if (req.url ~ "^/contact/")
{
   return(pass);
}
Restart Varnish:
sudo service varnish reload
Be sure to test your contact form once you’ve made these adjustments.
Setup NewRelic Performance Metrics
NewRelic is a performance monitoring service which offers a free level of service integration with W3 Total Cache. The creator of W3 Total Cache recently wrote this guide to WordPress optimization on the NewRelic blog.
Enabling NewRelic on your server provides for monitoring such as shown below (my server page loads are currently slow only because I’ve been spending a lot of time in the non-optimized WordPress Administration console):


To get started, from the WordPress Administrator Console, click Performance -> Monitoring. Click sign up for a free account. Copy the details for your API key.


Once you’ve completed that, follow the installation instructions on the Debian-based systems page.
Edit your PHP.ini file:
sudo nano /etc/php5/apache2/php5.ini
Add the following line to the bottom with your license key:
newrelic.license="xxxxxxxxxxxxxxxxxxxxxxxx"
Restart Apache:
sudo service apache2 restart
Enable New Relic in W3 Total Cache. Visit the Performance -> General Settings page. Scroll down to the Monitoring panel. Enter your API key here.
Integrating Google Page Speed to W3 Total Cache
Google Insights provides details about improving the performance of your blog (learn more about Google Page Speed ).

Sign up for a Google Page Speed API key. From the WordPress Administrator left sidebar, click Performance -> General Settings. Scroll to the Miscellaneous panel and add your Google Page Speed keys.

[sc:TutorialFooter]